Tuesday, November 30, 2010

Double Irish Chain

Back in high school I made a really beautiful quilt for my boyfriend at the time. The pattern was called True Lover's Knot and involved nine patches (this isn't mine but it looks almost identical). I used a navy blue fabric and a white on white so it was still masculine and very sharp. It is a gorgeous quilt that I hope he still enjoys using. I finished it 2004 and since then my mother has gone on and on about how much she loved it and that she wants one identical to it (she has a love for little squares lol). So this year since I knew I was going on the quilt retreat I decided it would be a great time to make my mom her quilt. There was one catch tho, I didn't want to use the same pattern. It just seemed weird and I didn't want to make the same exact quilt. She and Roy deserved their own pattern. Now, there is NO shortage of quilt patterns that have small squares so I didn't have any problems finding one that she and I liked. We decided on the Double Irish Chain. Roy is part Irish, it was mostly little squares, and I could easily be made in Navy and White. The book that I found the pattern in had the quilt coming out to be the size of a full. My mom has a California King bed, so some adjustments definitely had to be made. I double the fabric amounts it listed and that would be more than enough for the top. WRONG. I cut the fabric I thought it would require before the retreat, thinking to myself "now all I have to do is sew it at the retreat!". When it came time to work, I was seriously disappointed to find out that I needed to cut MORE fabric and then to see that all the fabric I had bought was used up. Now obviously this didn't ruin the quilt or anything, I just don't like it when things don't work out the way I hope they would. I was still able to get a good amount of work done, but I can't help but wonder  how much progress I would have made if I hadn't had to spend my time cutting. SO, here is what I was able to get done:
I was able to complete 2 rows! It's a little hard to really see the pattern but that will change as I put more rows on. When I put this on my moms bed to see how it would fit, it still wasn't big enough. So, instead of having to take apart the end of the row to add more blocks, I'm going to sew there as columns instead. Luckily that won't change the pattern of the quilt.
The first block is made up of just the 2 inch squares. The second block has a navy rectangle with a navy and white strip. This will make the Navy look almost like diamonds. When I'm totally finished I'll go through and snip all the thread to clean it up. Over all I think it's going to be a very nice quilt and my mom is going to love it. And even better, Roy won't feel like he's sleeping under some lady blanket haha. I don't think I'll be able to have it finished by Christmas but I do hope to have more of it done within the month. I'll certainly post my progress as it gets bigger!                                   

Tuesday, November 16, 2010

Yoga Bags

The other day I bought a new yoga mat (my mother has buried mine in the garage with the rest of my belongings). I like this new one more than the old one and as I was sewing a Christmas gift I had some extra fabric. I looked at my Yoga mat and then back at the fabric. A light bulb moment. I really like this particular fabric and was hoping there would be extras to use for something. Eureka! A Yoga Mat Bag! I measured my mat and measured the fabric I had left, it was the perfect amount! Now, I've never seen a pattern for yoga bag, let alone had one handy, so I just kinda made one up and hoped for the best. This was the result:

I was so thrilled with the way it came out I HAD to make another one! I cut out some more of the gift fabric so I had enough for both and with the extra made another bag. Success again! Apparently making my own patterns isn't as difficult as I imagined it could be. Granted it's really only a tube with a handle, but I'm still pretty proud of it for just being in my noggin.


 This is the second one I made. The best part is, it only took for a couple hours to make both of these! And they're super cute! I can't wait to make more with the other fabrics I have! Joann's is getting a lot of new fabrics so it will be hard not to buy it!


 I also started ab Etsy page this past week. I've been shopping on Etsy for a while now but had never considered trying to sell the things I was making. So i finally got up the nerve and did it! So far I've had someone buy a blanket! Unfortunately I didn't realize that the fabric was gonna cost me a lot more than I was charging. Lesson learned. A girl can't make a profit when she's selling things for less than the cost to make them! Maybe a business class is in my future haha. Since I do value all your opinions, take a look at my Etsy and give any suggestions of thoughts. It's a little sparse at the moment but I have some new items in the works to give it more depth. Here's the link: http://www.etsy.com/shop/SarahAshleyCrafties 
Thanks for all your support followers and fans! I couldn't do it without yous guys! Much Love!

Tuesday, November 9, 2010

Lasagna Quilt

I survived a weekend of quilting and it went better than I could have imagined! It was so great to spend time with the ladies that knew my grandmother. I think Cassie and I spent most of our time talking with them about our what's going on in our lives, since most of the women hadn't seen us since high school. This was also the first retreat that my sister and I were at together. My grandma always took one of us at a time so we had never gone together. It was definitely a bonding experience and I'm glad we enjoyed ourselves. It felt so good to get back in touch with the quilter in me.
While I was in college I didn't really have the space or the resources to keep quilting the projects I had started in high school. One such project was a Lasagna Quilt I started my Senior year of high school. While at a retreat one weekend I found these flannel fabrics that were the brightest things I'd ever seen. The colors and patterns were so fun and vibrant that I knew I HAD to do something with them! Now, prior to this, I had started a flannel quilt that was a lot of work and I couldn't keep myself motivated to finish it. If the words, "Flying Geese" mean anything to you, you know what I mean. It's a beautiful pattern but it's very high maintenance and I just couldn't finish it. So, my grandma suggested I make something a little simpler so that it was a little more realistic for me to finish. (such a smart lady!) That year at the retreat they showed us a demo of a Lasagna Quilt. It looked pretty straight forward so my grandma suggested I make one.
The weekend I started the quilt I just about finished it. I got the top done and my first border on. I even started sewing one of my borders together. Unfortunately that's as far as I got. That was 6 years ago! SO needless to say, it was time to finish this quilt! And that's just what I did.
 It's meant to fit my queen size bed so that gives you an idea of the scale of it. I love it just as much now and I did in high school. It's so bright and happy! One of the fabrics I used is from Fiji too! My grandparents took a trip there and Grandma brought me back a fabric that she knew would be perfect for this quilt. (again, she's good!)
The staggered pattern of the strip is where it get the name Lasagna Quilt. This quilt is so east because there isn't really a wrong way to make it. As long as your rows of strips are the same width you can sew them in any way that suits you. I would definitely suggest it for someone looking to make their first or second quilt.
Now all I have to do is sew the back, which in high school I decided would be rubber ducky fabric (idk), and have it quilted. I can't wait to sleep under it tho. It's gonna be so soft and snuggley I may never come out from under it!

Tuesday, November 2, 2010

Halloweeeen

Sorry for the lack of posting lately. October got pretty busy for me with costume making. Two friends of mine asked me to help them make their Halloween costumes for them, so I said I would. It turned out to be quite the test of my design and construction skills!

My friend Cody wanted to be Bam Bam Rubble and
sent me a picture of the costume he wanted. Here it is:
So, with picture in phone, I bought the fabric, took the measurements and hoped for the best! After about a day of sewing this is what I came up with. I'm pretty proud of the way it came out. I was originally going to make it with a shorts pattern but Cody insisted it be a skirt. So a skirt I made, with pockets so he didn't lose his phone while out on the town.  Most importantly, he liked it AND it fit! haha


The second costume I made was a fixer for my friend Casey. She found a lion costume in an infant size that she cut the arms and legs off of so she could just slip it over her head. She then but open the sides to fit her body. She then brought it to me haha. We decided that she needed some fuzzy arms and legs to add to the costume and that some elastic up the sides would finish the body. So once again, I got some fleece this time, took the measurements, and set out on my adventure. The legs were pretty simple, make a tube with elastic at the top to cover her shins. Easy. The arms I wanted to be cuter than just a sleeve, so I decided that the sleeve should cover her and and come to a point at her finger.
   The end result was better than I could have imagined! I used a loop of gold elastic to keep the point on her finger. It's not entirely lion-like but I really think it added a cute element to what could have been a boring old sleeve.
The elastic on the sides of the body were east to sew on and before I knew it, I had a lion costume! Ok, so it's a little silly but I like it and it works. And you can't deny that she's a pretty cute lion!


With all the other costume making and I no time to make my own costume! So, on Friday, the day I needed a costume, I looked at my resources and came up with something. Meet the Zombie Homecoming Queen:

I had a bunch of old dresses from high school and I kinda knew I would wear again. This was one I wore to homecoming my senior year. I was surprised it even fit! With a cheap tiara and some makeup from Walmart, it turned out to be a pretty good costume I think! I always wanted to be something scary for Halloween and at the age of 23 I'm kinda over the whole "slutty costume" thing.


The makeup was really fun to do. I've done stage makeup before but never zombie makeup. Before attempting anything I watched a lot of tutorials on youtube and looked over pictures online. After getting a few pointers and tips, I gave it a try. This was my first try and I couldn't be happier! The bruises looked too real! It wasn't pretty but I still liked it. haha.

So, that was my Halloween. I hope yours were tricky and treaty and full of candy!  Hopefully I will be able to get back to my other projects that I've started or are brewing in my head. This weekend is the quilt retreat so there will be much to update and blog about next week! :)

xoxo

Thursday, October 7, 2010

The Beginning

This is the note I wrote for my grandma when I was 9 or 10. While my sister and I were cleaning out her sewing room last weekend, I noticed that it was still up on her cork board, where she had put it so many years ago. I remember seeing all the other papers and patterns and measurements come and go around it, but the note stayed. I guess it had never occurred to me that the little note would mean that much to her. She taught me everything she knew about sewing and fabrics and I am eternally grateful to her. I love being able to sew and create things and know that she is with me and that that part of her lives on through my sister and I.
In high school, my grandma would take my sister and I to a quilt retreat for a long weekend. She and I were always the youngest people there and we never realized what an impact that had on my grandma and the other ladies at the retreat. I haven't gone since I went away to college, so this year my sister and I have decided to attend on our own. It will be the first time going since our grandma passed and the first time Cassie and I will be going together. The retreat ladies are excited to have us and a part of me is excited too. I think it's definitely going to be emotional for both of us. But beyond that, I think it will be a great time to get some projects done. I have a quilt that I started at a retreat while I was in high school that I am determined to finish as well as a quilt I want to start for my mom and stepdad. Overall, I think it's going to be a great bonding experience for my sister and I. As long as we don't argue haha

Thursday, September 30, 2010

How To: Tie Blankets

Fall is upon us! And with fall comes the urge to comfy, cozy, and warm. A great way to achieve such a state is a fuzzy blanket. Fleece Tie Blankets are perfect super easy and fast to make. I get a lot of people coming into Joann's looking to buy fleece for these blankets and many of them have questions about how to make them. SO, i thought it would be a good idea for my blog!

What you need:
  • 2 pieces of Fleece: 2-2.5 yards will do depending on how tall the blanket user is. I like big blankets so I use 2.5 yards. 
  • FABRIC scissors. When dealing with sewing its always smart to have a certain pair of scissors that you ONLY use on fabric. 
  • A large enough space to lay your fabric out flat and sit around it. I use my living room floor.
  • Confidence! You really can't mess this blanket up too badly so don't stress it!
Step 1.
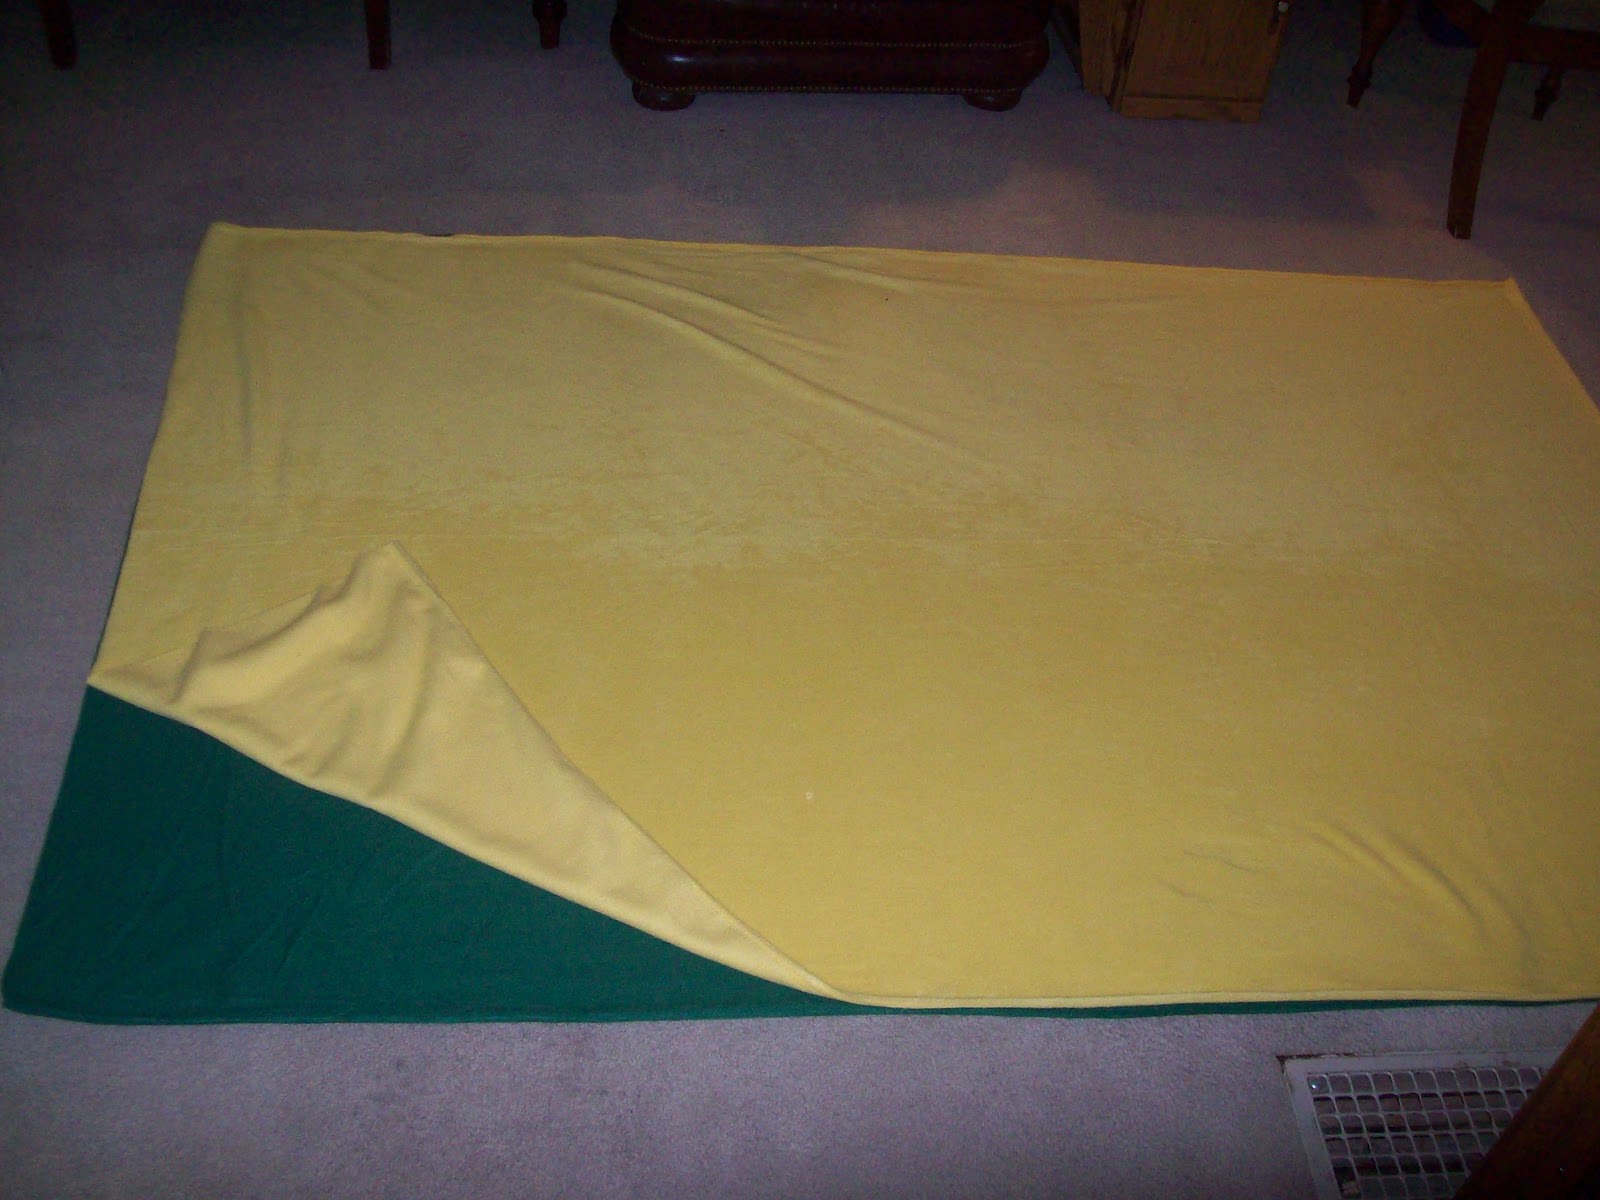
Lay your fleece pieces on top of each other. If one(or both) is printed make sure the tops face away from each other. Line up your edges and corners and smooth your fabric out.

Mine this time is Green Bay Packers colors. I made it for a friend of my moms. Smooth out the wrinkles as much as possible. Fleece is pretty workable so it shouldn't be difficult.

Step 2.
Get your SCISSORS! I usually start cutting on a short end of the blanket, creature of habit I guess. Make your first cut about 10in. from the left hand corner. Make your strip 8in long and 2-3in wide. See picture below:


Step 3.
Make some knots!  This ill make sure that the bottom color shows on the top.

 Knot your top to your bottom, like the first step of tying your shoe.

Then knot your bottom to your top. This ill make sure that the bottom color shows on the top.


Keep cutting and knotting all the way down the side. I usually cut a few, knot them, cut more, etc.  Stop when you get 8-10in away from your next corner.

Step 4.
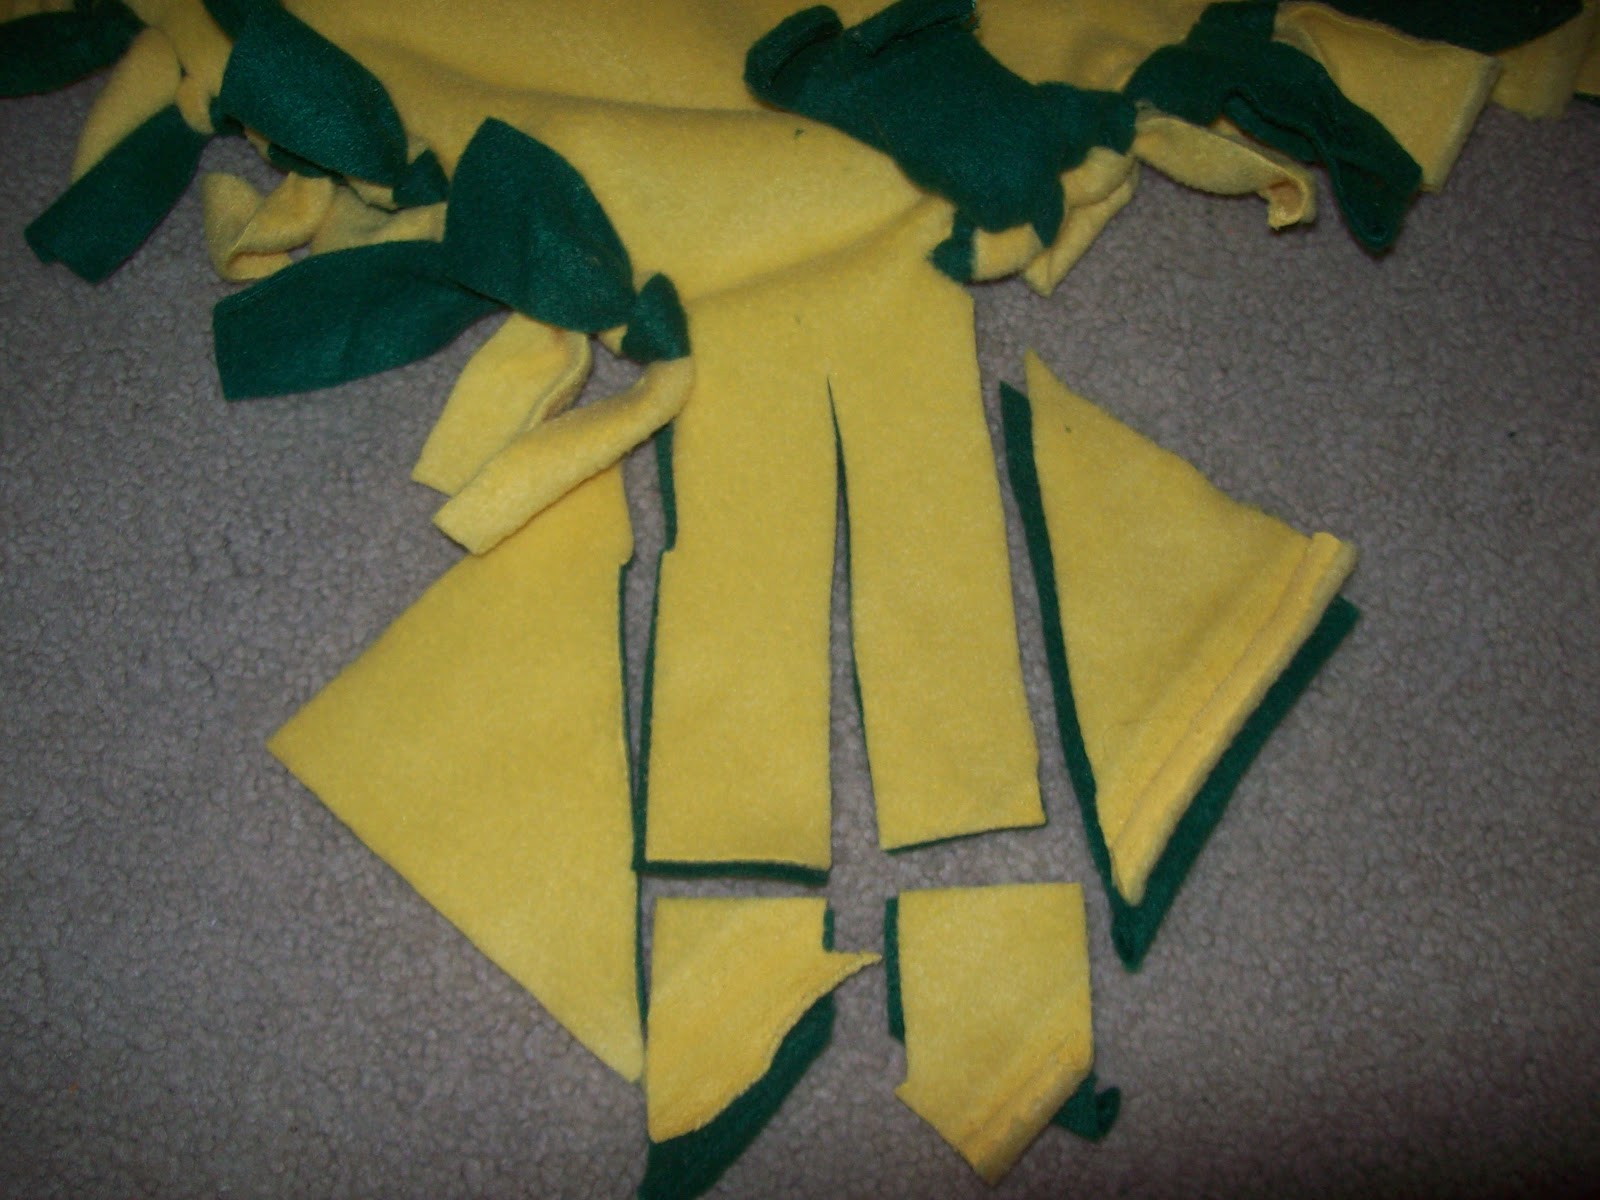
The corner!!! I get more questions about the corners than anything else. They can be pretty tricky but I think I've found an efficient way to get them done. Start on your next side just like you did the first one, Leaving a square of fabric in the corner.
Alright, time to conquer the corner!!! Face the corner so that it looks like a diamond. Cut off the left and right corners of the diamond so you have a strip of fleece left. Depending on how wide this strip is, you might have to cut it into 2 strips (like i did). Snip off the pointed ends and knot your tops and bottoms just like the rest.

TA-DA! One corner! You did it!

Repeat steps 1-4 and you'll have yourself a blanket in no time! Told ya it was easy :) If you have any questions I'm more than happy to answer them! Get creative with your fleece too! And it doesn't matter if you use Blizzard or Anti-pill fleece. They are both snuggley!


            Good Luck and Happy Crafting!

Tuesday, September 28, 2010

UNC Throw

This was one of my early pieces I made, that I have a picture of. In high school, my boyfriend was accepted to UNC at Chapel Hill. As a graduation gift I wanted to make him something UNC related but I couldn't really find fabric or pattern that I wanted to use. So, with my grandmothers help, I designed my own pattern and template for a throw:

I must say, I was pretty impressed with the final product. There were SO many elements in this blanket that I had never used before. I appliqued the NC logo, "Tarheels" and UNC letters; a pretty big project in itself! I free hand stitched the "North Carolina" at the top of the blanket. Another large task to take on! I couldn't have done it without my grandmothers help, and to her I'm eternally grateful. She was an amazing sewer who taught me everything I know! I don't know if my Ex still uses this blanket but I sure hope he appreciates the work and thought that went into it!